We all know about the soil health principles: cover soil, minimise disturbance, diversity in rotation or plantings, minimal chemical usage, living root in the ground as often as possible, they’re repeated ad nauseum at agriculture conferences and on YouTube.
But how do we make this a reality on our organic horticulture operations? Apart from the standard “go no-till” mantra – which isn’t that useful – and is kind of implied anyway. We now have working examples at every scale, from which we can extrapolate some principles of how to actually transition to soil health practices. What seems clear is that success stems from a rigorous application of the soil health principles as a whole, rather than a dogmatic adherence to one particular method or another. By that I mean a dogged and on-going attention to every aspect of the growing system. Constantly looking to eliminate- or substitute current management practices with better, more concurrent ones. And it comes by taking a cold hard look at every aspect of your management practices to find solutions that increase- rather than deplete or diminish soil health. Basically, when you apply the principles consistently, they work, it seems.
Some might say the case studies I might point to are too few or too far removed from the UK context to be relevant. But I believe this doesn’t diminish their value. Especially as the success they report is relative to their neighbour’s and their local area and therefore, in context. And anecdotally, this author has demonstrated examples of these successes on organic horticulture operations in the UK (this is for another piece). That said there are a number of key challenges associated: raising a tilth for easy speedy planting, weed control and the issue of mechanisation. And potentially, the thorny issue of how much land is under cultivation. As well as this there’s the challenge of making high-labour operations pay, which they can. But the marketing needs to be right as well as the agronomy.
The take home message is that it can be done. And there are real production benefits for doing so (over and above any do-gooder points you might win, on paper).
Here are some tips for achieving these aims/goals/outcomes. The focus of the solutions given in this article centre around small-scale growing operations. But the principles apply equally under, larger, mechanised operations. The technologies will vary with the scale.
Don’t allow grasses to establish in beds or paths
What’s good for the goose, ain’t so good for the…
Although there is much good that grass can do for soil: it protects the soil over winter, it helps to control perennial weeds etc, it is, however, the one type of herbage for which deep or repeated cultivation is heavily indicated.
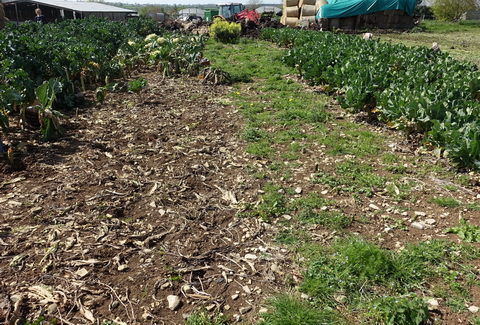
It’s fairly common practice to keep the crop clean till mid season and from then to allow weeds and often grasses to establish and to let them to grow-on over-winter. This then acts as a green manure. Which is good right. However since it’s grass (a turf-forming perennial) cultivation is strongly indicated when establishing the subsequent crop, and that that cultivation will likely put the soil back to a worse state than before your short period of grass growth.
Although we are looking to provide overwinter cover, we’re trying to eliminate cultivation passes wherever possible, so this is a no-brainer and potential an easy win. And leads on to the next topic.
Pitney Farm grass/clean soil
Avoid perennials in fertility plantings
Green manures/cover crops: grasses, clovers etc
Like grass before, clovers and other broadleaves type species, commonplace in ley sowings are all perennials, and as such have rather limited options for destruction (as well as a need for frequent topping through the season, to “keep them growing” and to prevent seed shedding). Typically a clover ley may need multiple passes to achieve a reliable kill.
This option is another example of where tillage is about the only destruction option for organic producers. Obviously spraying-off would be a non-disturbance option. But sprays have a detrimental effect on soil biology, less than tillage but still there. That said, it’s not that grass leys aren’t good for soil health, far from it, where given sufficient growth periods. By sufficient we mean a year plus, ideally multiple years. As they say: you’ll never have better land than when it’s first out of grass – with the exception of wireworm (perhaps another reason to consider alternatives). Yet there’s nothing magical about grass (or more specifically: perennial, turf-forming grass) when it comes to soil building. It’s just that a ley normally ticks all of the soil health boxes in one go: covered soil, living root, diversity, no disturbance and ideally grazing.
However there are other routes to this end. We can mimic these situations with our management practices (see below) in a cumulative fashion and as well as in our species selection for green manures and cover crops/leys, and achieve similar results.
That said, in a cropping situation, basically unless you’re actually also grazing (essentially a mixed farming operation) then perennials in fallows, are contra-indicated.
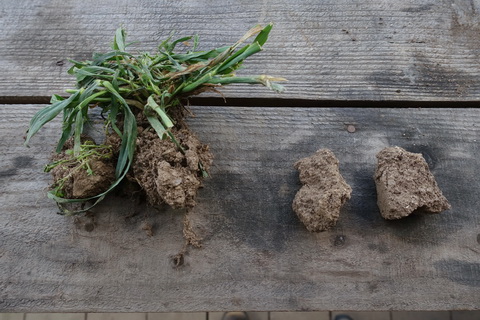
Soil at right (with lost structure) required tilling to come out of cover crop (at left)
Select diverse and annual species in cover crop mixes
The fact is in the case of organic hort we are cropping, and we are cropping annuals.
So, when selecting fertility building strategies we should select short-term, annual based cover crop mixes as opposed to leys. In this case, select annuals (or biennials with easy destruction options like sweet clover). And select cover crop (CC) mixes, with: high diversity and high biomass (often called “cocktail cover crops”). Allow these sowings to mature before terminating – ideally using non-inversion methods like rolling, crimper/rolling, mowing, trample grazing or sheeting down (this latter option can be used to kill immature CCs also). This will ensure “grass like” soil building results, in a much shorter time-frame, without the need for grass-type termination – ensuring all that good structure that was built under the cover crop is carried-over to the cash crop.
Also diversity is key to realising the full potential of these types of plantings and likely to be much better results than with straight green manure sowings e.g. red clover (see pic). This is probably one of the easiest wins in this list, for those that work with- or are considering cover cropping in their operation.
Trill Farm: soil under: cocktail cover crop vs red clover green manure
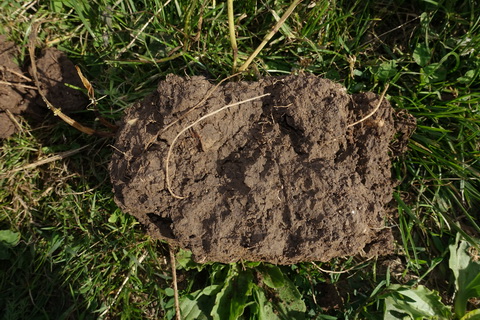
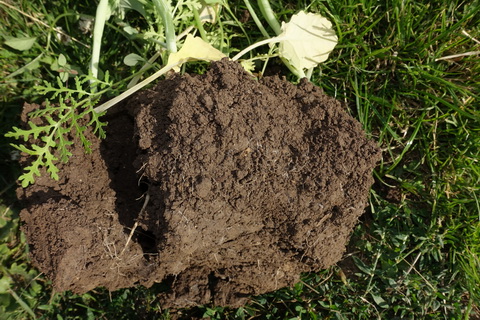
Soils under cover crops. Cocktail cover crop (at left), red clover green manure (right)
Be honest about bare soil over the season
We all think we’re keeping tillage and bare soil to a minimum but how much are we actual achieving
Most growers these days are pretty concious about tillage, and are aware of the ills that it brings and have as such taken steps. That said, it’s easy to overlook the extent of current practices on the ground.
In order to make a change successfully, it’s important to know what the current situation is, and measure against that baseline. Answering the following questions may get somewhere towards this: How long are your beds fallow? How long are your beds out of production? What are the dates between your first cultivation and first (or even last plantings) for a given bed, or block? Fallows (even short) = no crop, no growth, no yield, no soil building. A loss of carbon, nutrients and structure. Since, without a living root there’s no energy source entering the soil, as such, your fertility is literally disappearing into thin air, as the organisms actually consume their own “houses” (or the organic matter they had fixed, in the growth period).
Mark the answers to the following questions on your existing rotation: when the crop came out, when the cultivation passes were made and when the following crop was planted. Total-up that time and multiply by the number of beds this gives a figure of area of land per unit time that was bare. We’re aiming towards a situation where soil isn’t bare at all through the year, as a cumulative figure over a 3-5 year period.
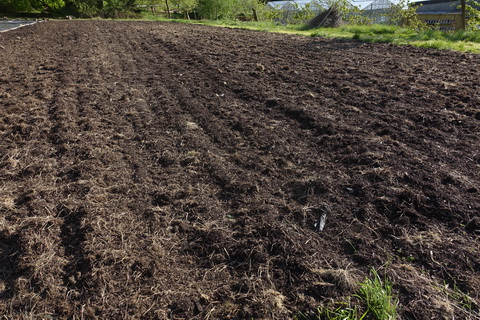
What’s happening here? what’s not happening?
Cover soil where time between cultivation and planting is more than a day
I will lay me down
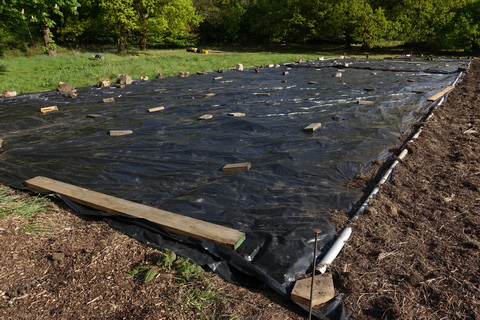
Where planting cannot be achieved shortly or immediately after a cultivation pass, consider sheeting-down. Not so hard at the small scale. This can be done with silage plastic or Mypex. And is very much a planning concern. Having sections of sheeting cut to size for the beds (or blocks) that are ideally well stored (on reels or folded neatly for speedy application) is heavily indicated. Another potential hindrance to convenient and speedy sheeting-down is weighting the material in place so it doesn’t blow away. The best solution I have found for this is reusable sand bags.
More of a soil health preserving technique than a soil building technique. This will prevent weed seeds from germinating and possibly help to raise a tilth as the soil organisms digest residues (and mineralise residues) in the soil. Basically, when clearing beds don’t allow them to lie fallow. Even for a few days. Annual weeds like chickweed can establish in very short period. This approach would be at odds with bastard fallowing, both the latter is also at odds with soil health goals as well, so there it is.
Bed preped, sheeted-down.
Clear beds with care
Living root/covered soil
When clearing beds: cover soil between following plantings or leave the crop in. For instance with a cabbage/broccoli crop: after harvesting the heads, leave the crop in – the leaves will continue to suppress weeds and protect soil and the roots will continue to structure soil over winter by producing root exudates.
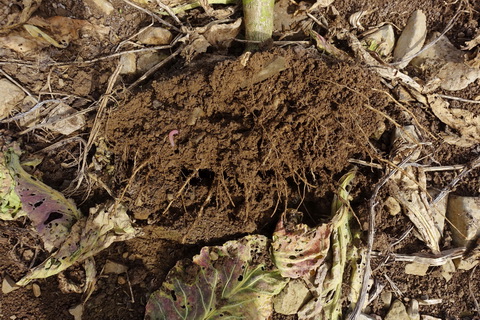
Pitney Farm: overwinter brassica roots – best soil always around roots
Moreover where clearing beds, even just a single row, sheet it down immediately, this will ensure it’s weed-free for planting the following crop. While potentially improving the tilth by encouraging worm- and microbe activity (aggregation) close to the soil surface. Though it must be pointed-out that this period will be a slow loss of organic matter, since no foods are entering the soil profile, due to the loss of root exudates. With this in mind applying a top dressing of organic mulch, beneath the sheet, will give the microbes an subsistence ration to tide them over, for this period. See also pics below: Trill Farm elephant garlic
The minus 6 week fallow
Living root/diversity/minimise disturbance
God speed the planting
When clearing beds: transplant or sow with cash crop or cover crop or sheet-down immediately. Unless already undersown.
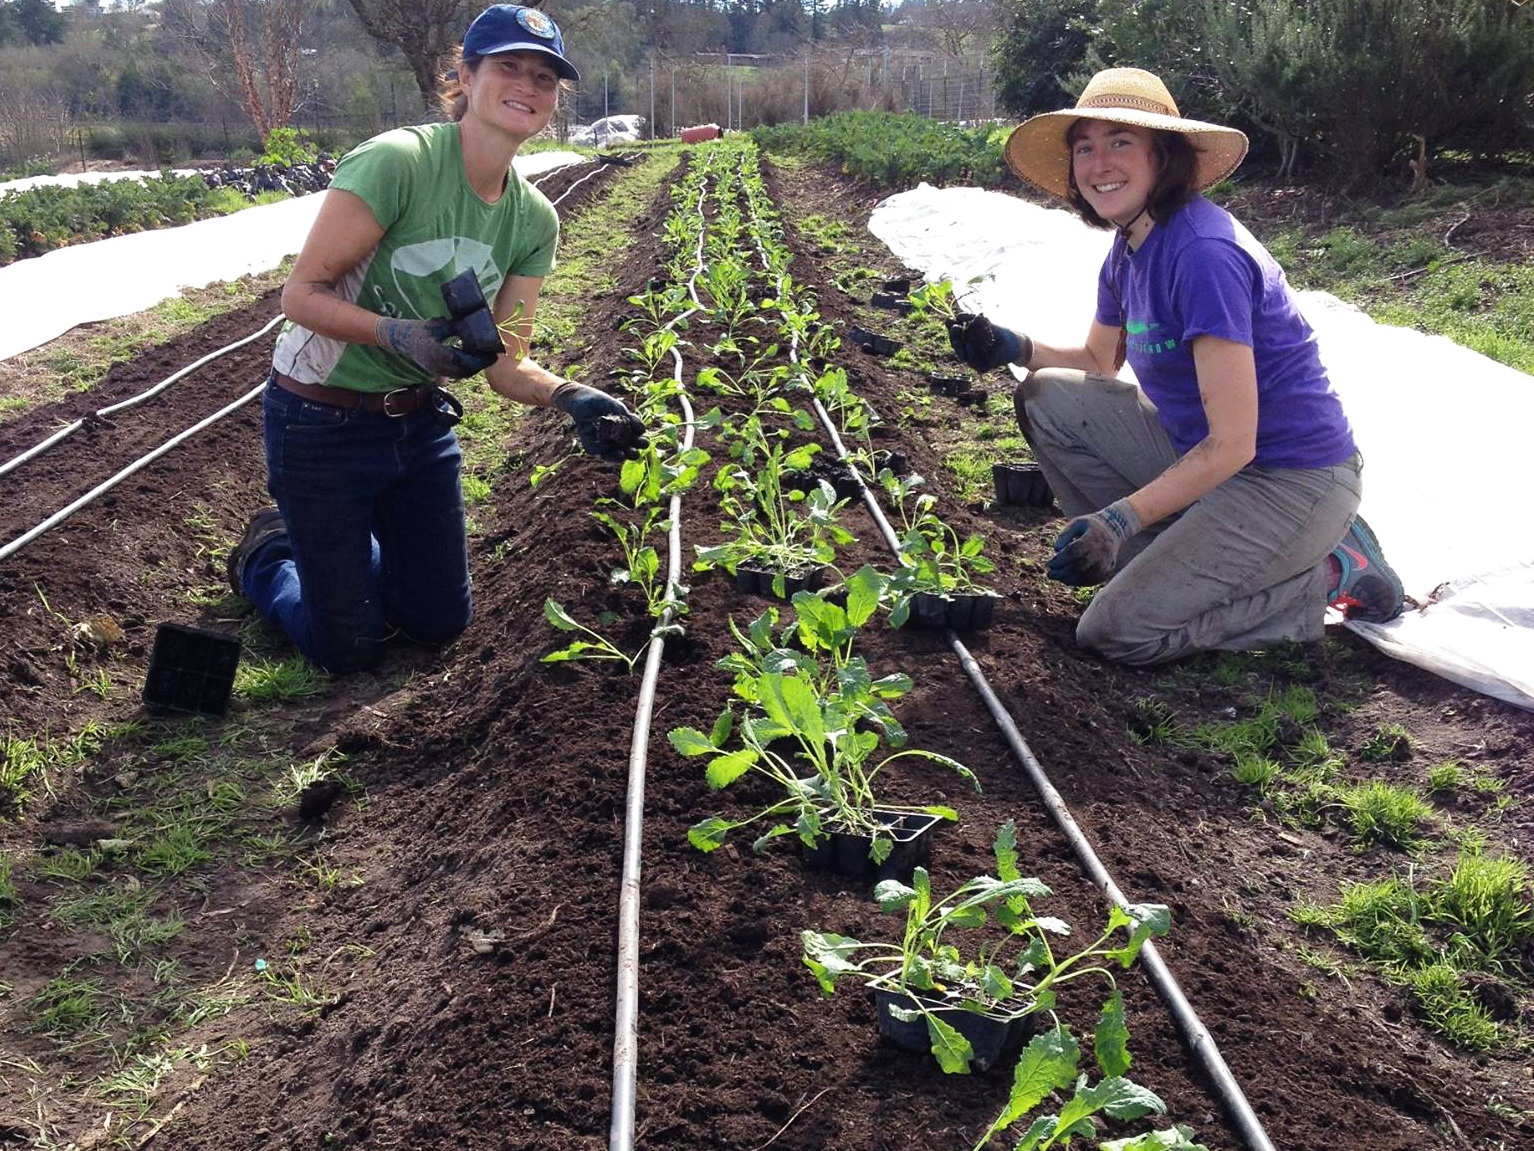
We’ve all heard about”5 min fallows” -where the cover crop is drilled into the stubble of the previous crop. This is one of the main advantages of convention no-till arable and it brings benefits to the system by eliminating the time for ploughing-down the stubble and raising a seedbed. But even this leads to a break in root activity, and hence root exudates production that will be somewhere between a few weeks to over a month and some farmers prefer using something like Spikes Rotors in order to cultivate. During the period the now under-nourished soil organisms will begin to consume any accessible organic matter as a energy source for their metabolic processes and then go dormant. This will mean a loss of OM and slow loss of tilth. Remedy this, in the hort operation, by transplanting large/established seedlings directly after removing the previous crop. This will ensure a much reduced drop in exudate production during the change-over period.
Having the follow-on crop planted from large transplants will take up the slack much more quickly than standard plug plants. In this case we’re talking about 2-3″ cells, or 6″+ tall plants, or thereabouts. That said, this approach will certainly require additional propagation capacity. Though, the transplants will be more robust and, if properly husbanded, will have a much lower loss rate, and likely to be less nutrient stressed before going out.
Only a no-till practice will allow this approach. But we can go further.
No-till planting, straight-in, no break. Credit: Singing Frogs Farm
Leave roots in-place
Living root/minimise disturbance
The root zone is where the aggregation process takes place – roots build soil
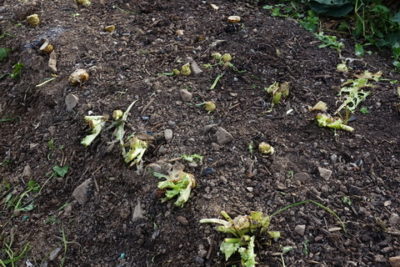
When changing over from one crop to the next, the standard practice is remove all crop residues, roots and all. This is disadvantageous for two reasons: firstly, the soil around the roots is always the best of the best in terms of structure (tilth), the root zone is where the majority of the microbial activity – therefore nutrient release and biotic glue secretion (aggregation) takes place. Even with the most vigorous shaking you’re still going to end-up exporting most of that soil to the compost heap – which isn’t a terrible place for it, just not where it is needed most – there’s other ways to get soil into your compost.
Secondly, and most significantly, roots of established crop plants go on producing root exudates after termination, in fact most plants put out a mega pulse of exudates at the moment of termination/defoliation (this is why mob grazing is so good for the soil). At it’s dying gasp the plant gives up the stored sugars for the next generation. So where coupled with relay-cropping (as mentioned in previous heading) there is the absolute minimum drop in exudate production and with it the processes of soil aggregation and soil organic matter building remain near-continuous. As well as that, the residues from your crop roots will go to feed saprophytic organisms, which will end-up contributing to the pool of available nutrients, as this matter is recycled.
That’s not to say that this will be practical with every crop, root crops for instance, and some leaf crops (like chard for instance) will want to regrow from a defoliation but if you keep hitting them and you’ve put in good transplants, this system can- and does work very well. As with all these tips, the practice will need to be mastered, which may take a number of iterations to achieve. And requires no-till practices.
Roots – let them keep on working
Reconsider bed-forming
Do you really need formed beds to farm successfully
Formed beds are a common way to raise crops in market gardens and hort operations. They can bring yield benefits and isolate crops on wet sites. That said, unless these beds are permanent they will have to be formed (and in some cases flattened) in time. This is another tillage pass. And as such is actively undoing the good work that roots of crops or cover crops may have done in the preceding growth phase. It’s also work, and time to implement which we are looking to minimise throughout our analyses of management practices. Some high efficiency, min-till farms have rejected formed beds on both of these grounds and established a positive precedent for a “flat bed” system, ultimately deeming it unnecessary and unprofitable to do otherwise.
The other final consideration, as with all these tips, is weeds – and having a concave path cross-section means you need either specialist weed attachments for tractors or you’ll need to spend more time hoeing (since it’s harder to hoe the side of the beds) – inevitably you end up breaking down the side of the bed, which forces a need for reforming in due course. That said, if you do run a permanent bed system, or wish to- then hand weeding is indicated, as it is with no-till outcomes. In this case, optimising this practice with good quality knee pads, or a lazy weeder system is indicated.
If you are bed-forming on your operation, include when and where on to your “expanded rotation” chart, to log how often this work is carried-out. To complete the baseline survey.
Survey & analyse weeding practices
Identify and replace
Step two in a two-step process. Particularly in organic operations weed control can be one area that cultivation is kind of “forced” into the system. And depending on the technique used there is the possibility that it will have a measurable impact on soil health, serving to undo some of the good work that your fertility building practices have achieved.
This is a diff one, since it’s difficult to quantify the level of disturbance that a particular weeding technique causes. We can probably say that reducing the number of weeding passes would reduce the total amount of disturbance in any one season.
To establish the baseline essentially we want to know what weeding techniques do you currently use & how much disturbance do they cause? Further to this: when and where are these weeding passes carried-out? Record this information on to the extended rotation.
That said, control as a concern is made up of two factors: weed growth/germination, and established weed control. The former being one of the main arguments for going no-till. That is to say that tillage (or disturbance) actually stimulates weed germination. Thus further creating the need for cultivation, the definition of a vicious cycle. That said the complete elimination of cultivation (for weeding and ground prep) which is what no-till boils down to, may not be practical for you or at a given scale. There are small-scale commercial examples where they have completely cultivation for weed control. These operations carry-out small amounts of hand weeding, mostly at crop establishment stage (where competition- and shading is low).
Either way, I think it’s important not to be too hard on yourself, there’s much that is subjective when it comes to assessing the impact of different weed control practices.
With this in mind, to me it seems like setting-up an experiment – comparing a small number of practices side-by-side and using an empirical approach to evaluate the results is indicated. In the end, the goal is to move to a low maintenance system. And the essence of low maintenance is to eliminate a practice altogether, where possible, while retaining production.
Keep weeding till they’re done
The darkest hour is just before dawn
The first 2 years out of cultivation will be the worst for weed pressure. You may need to buy in more labour at this point. Or have more areas sheeted-down, for longer. But don’t give up, once the seed bank is exhausted the rate of germination will steadily decline. Until it bottoms-out at a low and manageable rate. At this point wind-blown seed will probably be the main vector for weed establishment, so here is another place that covering the soil has a real part to play.
When establishing transplants having a light covering of mulch will also help to suppress germination from the seed bank. Especially important for young plants to get their heads above the competition.
This is probably the biggest source of “pain” in a transition operation and shouldn’t be underestimated. But once you’ve made the decision to go down this road, don’t be tempted to resort to cultivation when it all looks bleak, you’ll undo all that good work and reset the seed bank. In this case, sheeting-down areas that have got away from you is heavily indicated, or reviewing the amount of land under production. With a view to reducing that, to a degree, either temporarily or even permanently. However much of a wrench that is, I think it is worth having all the options on the table when attempting to deliver the soil health principles on the ground.
Fill-in between wide-spaced cash crops
Don’t let that space between your newly planted brassicas go to waste
Living root/covered soil
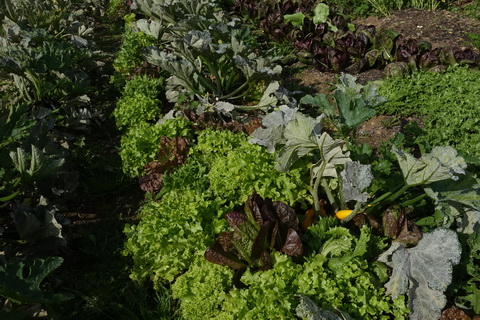
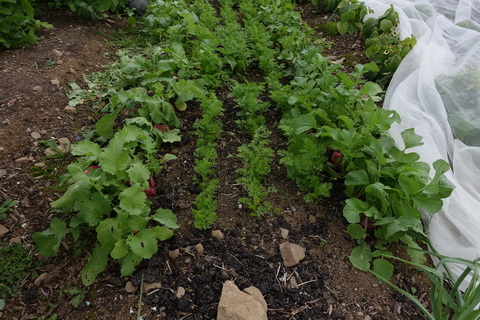
Intercropping is a long-established practice and perhaps it’s benefits have been emphasised mostly in regards to weed control, with other factors being down-played, or thought to be negative – like possible antagonisms with the main crop and the belief that this type of practice will put more demands on the soil. The reality is the opposite (so long as we’re adhering to the other soil health principles) – the extra diversity of crops brings a diversity of root exudates which supports a diversity of soil organisms, which is particularly significant in the case of brassicas for example, as they are typically non-associating with mycorrhizal fungi which means that if you’re growing beds of brassicas, you’ve basically forcing your mycorhizae into dormancy or death (through the loss of access to foods from host plants). If you’re catch-cropping with fast-growing species of plants that are not brassicas you’ll be helping to keep those fungi established and providing longer periods of active root exudate delivery to the soil.
Coupled with this is the fact that these fast growing plants will put out a low canopy that will cover (protect) the soil, from evaporation and damage from rain splash (helping to maintain that all important surface tilth).
Plants for this system will typically be: lettuces, radishes or other short-season salads. Again, if we want to optimise this approach (as above) we want to be transplanting, though direct sowing is also possible. We will need sufficient propagation capacity and to introduce an extra line in our cropping plan – to ensure these additional crops are produced and ready for transplanting with the main crops.
Also full-term combinations of cash crops maybe indicated. Either way the goal is to have a living root in the ground as long as possible while attempting to have diversity of those plantings.
Down Farm: intercropping & catch-cropping
Reach for the crutches
Young plants planted into soils newly in no-till will lack necessary
Don’t try to go cold-turkey, or ignore traditional plant growth aids. Organic materials can be put to use to ensure good results, without being beholden to high volume inputs. Young plants benefit from access to nutrients, if they are to get away (and out-compete weeds). In this case we can look at compost as an organic starter fertiliser for young plants.
For example, produce or acquire good quality aerobic compost. And other inputs. In this case, we can look at the compost as a starter fertiliser, albeit a very good, organic one – only there to get transplants away. 1cm or 1/4 inch of compost applied at planting. The organic matter in the compost will also feed free-living saprophytic organisms that will help to liberate more nutrients into the surface zone of the soil. They may even likely help to create something of a “biological tilth” through their activity. Which will help in future transplanting operations. NB though compost has many benefits, the organic matter will not contribute to stable soil organic matter or humus, it will be returned to the sky through metabolism and digestion. Though the CO2 enriched atmosphere around the soil surface will assist plant growth, since most of their stomata are on the underside of their leaves.
Contrary to some advise, I would say the application of the compost at planting is the most timely and effective point in the rotation, because although there’s an argument that it more will be wasted, or not utilised, this is the point that the plants need it most and also the point when the microbes need a boost, most, since there will be a pronounced drop in root exudate production
I see no reason that un-rotted mulch materials, like woodchip might also work for this purpose. Though the nutrient release pattern will probably be much slower. As well as this composted woodchip (year old material that may have been turned a few time) will also make excellent compost for top-dressing new plantings.
Having a ready supply of compost or other mulch materials will stand you in good stead. See picture of elephant garlic mulched soil below.
Raise a tilth by hand
Use broadforks or other non-inversion methods to loosen soil for speedy planting
There’s no doubt that transplanting into soil with a good tilth is much faster (and more pleasant) than where the tilth is poor. And direct sowing is perhaps However the creation of that tilth can be incredibly destructive, especially where repeated. There are two types of tilth: “mechanical tilth”, typically through some kind of tillage or working and “biological tilth”, which is the kind of natural crumb structure that good organic soil takes on. This you will find around the roots of healthy plants, either: crop or cover crop (see pic). This structure is resistant to weathering and degradation and will remain.
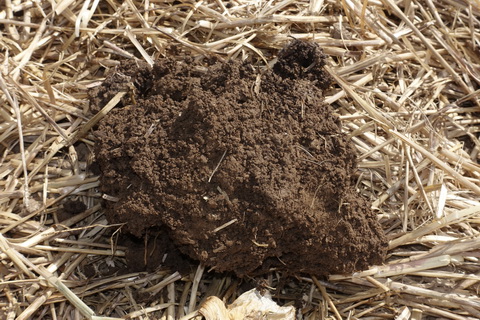
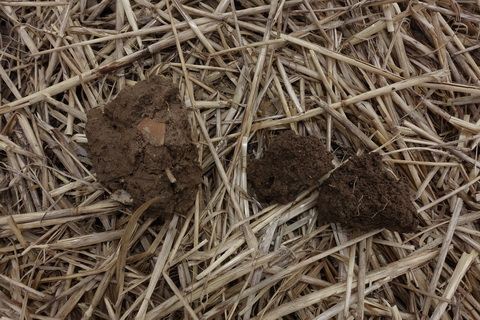
The trouble with mechanical tilth, that raised by tilling, is that although the seed bed could come-up nicely, which is sufficient for planting, it doesn’t last more than a few weeks or days before settling back into a packed, consolidated and homogeneous structure with little pore space (see pic below, at right, and compare that to the soil aggregation visible around the roots of a simple over-winter green manure). If this is the case you will be going backwards, steadily loosing structure and fertility every time the soil is preped for planting. Forcing the need for lengthy fertility-building phases where the land is out of production. The trouble is, is that the tillage triggers the digestion of soil organic matter by specific organisms. Which can give a yield boost, but contributes to a net loss in SOM and in tilth (aggregation).
In the transition phase, to facilitate efficient planting, as the biological tilth is building-up (developing) it’s an idea to find a means of loosing surface soil layers. On the small-scale the most heavily indicated tool is a broad fork (large two-handed fork), use this to loosen soil prior to planting, once or twice per year. Other methods include sheeting down, overwinter potentially with silage plastic, potentially with a top-dressing of mulch below, in this case, growers have reported soil conditions suitable for direct planting, albeit with a few vole burrows to deal with. And of course it will be weed-free.
Another avenue worthy of further exploration is the use of biological growth promoters like aerobic compost, composted manure, seaweed, humic acids, molasses or even mulches. These can be applied to soils to engender microbial activity at the surface. These should have a short-term tilth-creating effect, and when combined with applications of liquids this will increase the depth of activity. In high magnesium soils, calcium applications may assist with the process of loosening soils, and some growers use oyster shell or seashell meals frequently.
Finally, the default option, and probably least appealing is to just live with the heavier conditions associated with unworked soil and accept that planting will be more work and take longer to begin with. With the understanding that each year that the soil remains undisturbed the surface tilth will get better, particularly when combined with other soil health practices. Short-term pain…..
Trill Farm: aggregated soil from under straw mulch (elephant garlic) & Trill Farm: unmulched vs mulched soil.
How to Implement a New Cropping system
Analyse your rotation
Add a row or column, in your crop rotation plan to indicate which cultivation and weed control methods are used where and when
Our puny, linear, brains find complex problems hard to manage. Make the thinking manageable by using a design approach, like in permaculture. In this case we can deconstruct (analyse) the production system and find points of intervention (where we can apply the soil health principles). This process starts with a survey, followed by analysis and design (what will be). In this case the survey is of our existing management practices – the more detailed the better (within reason). Good record-keeping is another way to think of this approach. Like we know we need to record crop failures and yield, so too, the outline of the management activities we carried-out and carry-out as standard.
For this purpose the creation of a detailed rotation plan (additional to a cropping plan) is essential. A rotation plan should ideally have a:
• a row for the crop, indicating first and last planting dates
• a row for intercrops or under-sowing
• a row for green manures/cover crops, especially where they are undersown (can be included as above)
• a row for ground prep/cultivation work (could be same row as crop)
• a row for weed control operations – when carried-out and method used (especially important where cultivation is utilised)
This may seem an onerous task but once created a good template doc will help the team to review works carried-out and make judgements on the different practices. And will act as guide to future planning.
Take one step at a time.
Identify easy wins. Take each win as it comes. One by one
By analysing your rotation you will be able to isolate each one of your existing management practices and look at opportunities s to substitute or eliminate them one by one. Identify the simplest first and look to implement them in year one. If every year you can remove 1 tillage pass, by the end of 5 years for example, you’ll have eliminated most or all of them. For example, if you direct sow a lot currently, you could consider transplanting more crops, as this doesn’t require a seed bed.
Review the amount of land under management
If you’re roguing a lot, it’s probably too much
For current labour resource/capacity. It has been shown time and again that’s it’s possible to get more production from the same land when it’s managed better or more intensively If you’re struggling to keep on top of the weeds and are experiencing crop failures it’s possible you’ve got too much of your land under crops. Take land out of production. Consider cutting this back by having more beds down to cover crops or longer-term cover crops -so long as they are properly established. This will free-up time to focus more of your time and attention on the areas that remain. And enable you to apply relay-cropping, intercropping and successional production more thoroughly. There may be a net drop in output in the short-term at least but as you master the system this should take up the slack. Also you will likely grow healthier, better looking crops with less out-grading and less stress on you. If you have commitments to CSA members ask for their buy-in, or, with box schemes – drop the price.
I know of one example where net receipts increased significantly when a problem part of the field was taken out of production. It’s a big ask but, if you want to see radical results you need to make radical changes.
Make sure you have enough propagation capacity
Plant ’em high
The key to keeping ahead of the weeds and maintaining that living root is being able to transplant directly into a newly cleared bed, or between a standing crop and to be able to close-plant – for additional wee-suppression and output. For this you will need a ready supply of decent transplants in quantity and thus plenty of propagation space (or else, good credit with Delflands). This side of the operation can be a real bottleneck, or a significant financial burden (as alluded to previously). For this reason designing-in and installing efficient propagation facilities is highly indicated. Two-tier prop benches is a good way to go.
Be ready to market extra produce
Too-much is just as bad as too little
The up-shot of systems like these is more production (hopefully). Over-production can be just as much of a problem as under-production, with the additional picking and handling etc. Once the cultivation periods have been removed from the operation that time is then substituted with longer cropping periods. Coupled with the intercropping of main crop plants this all means more crops per year. But also, more crops of fast growing plants like lettuce. So it’s important to have an outlet for this produce, so it doesn’t go to waste or cause a headache. With this in mind it’s probably a good idea to have a wholesale arrangement with for example local caterers (over and above box or CSA) who can make use of the continuous supply of high quality salads you’ll be producing. Another reason to potentially review production area, as if you can maintain existing supply on less land, then scale-up, all the better. All sounds good in theory, I know, but it pays to prepare and of course it pays to market (hand that egg over to granny will you? 😉
Convince Yourself
Do some trials. Leave some land or start small.
In this case, many of those that have carried-out side-by-side operations have seen clear differences between the different treatments. And in one case at least, the production from the no-till portion significantly outstripped the tilled portion in just the first season. In that situation the result was clear and they have been no-till ever since. The same may not be true in your case. With this in mind, it’s important when transititioning to new management practices it’s a good idea to set up a small in-field trial and road test these practices in-situ. When setting-up a trial it’s important to select a crop that is fairly straight-forward to husband (and perhaps one that you have an excess of transplants for) and to establish a clear metric for quantifying success. The most obvious option would be (marketable) yield. However it’s also prudent to have a separate line, in the accounts, for each plot when harvesting to ensure that each pick gets weighed and logged separately. That said, estimating grade outs as a proportion of the crop would also be worth considering IMHO, as well as potentially quantifying savings, in time, from weeding/prepping etc.
Further to this, get “technical”, by measuring plant performance, and soil health directly, using visual assessments, these work particularly well in side-by-side trials. For example refractometers (“Brix meter”) that gives an indication of plant health, by showing the amount of dissolved solids in the sap, which is a measure of both the level of photosynthetic activity (% Brix value) and the degree to which the plant is converting those sugars to more complex (and useful) compounds (fuzziness). One test that I think is essential is the “spade test”, to visually investigate the soil structure and aggregation. This can often be radically different between plots and is an indicator of future plant health and cropping success. Besides which it’s just good to know that what you’re doing (or not doing) is actually making a difference, down below. A list of test and instructions of how to carry them out can be found at the Sectormentor for Soil website: https://soils.sectormentor.com/soil-tests/. Accompanied by the app it makes the work of monitoring soils and crops greatly more pleasant.
A question of scale
Most of the examples given here are appropriate for smaller-scale operations, that are either not mechanised or little-use machinery. That is not to say that the soil health principles can’t be applied at scale, this is certainly not the case. However, typically, specialist equipment: transplanters, under-cutting weeders are heavily indicated. These will likely need to be fabricated. Faced with the challenge of implementing these practices some growers have gone the other way and just increased the labour force, which can be compensated for by the additional production. There is obviously a marketing implication in all of this, but the opportunities are accessible.
Conclusion
I am acutely aware that advice like this can seem somewhat glib or just impractical but I feel that there are some real opportunities for growers at any scale in the UK. I believe that a steady and on-going application of the soil health principles will lead to cumulative gains over time.
I also understand that many of you know this stuff already, and therefore know “what you need to be doing” but just don’t have the time, man power, or the energy to implement these changes. To me, utlimately the solution is the accumulation of small changes that accrue over time. If each year you can substitute or eliminate one just 1 or 2 of your practices, over time your soil will steadily move to a more healthy state, which in-turn will bring benefits to the crops and the production that will mean implementing more soil health pracitces will become easier year-on-year.
Even if just taking the basic steps like: avoid perennials, sheeting down as you clear beds etc. I think there will be gains to be had that can be built-on over time.
More Information
Niels Corfield is an independent advisor. Specialising in soil health, agroforestry and whole-farm planning. Look-out for his courses in 2018. Next one https://www.facebook.com/events/152898018767970/


